Help
Every article the Help button holds. Search them here; the Help button at the bottom right also answers questions.
Panel Designer
Panel Designer features overview
The Panel Designer lets you lay out an instrument panel on your aircraft's panel template, instrument by instrument, then export it, price it or send it to our shop. This is what is there and where to find it.
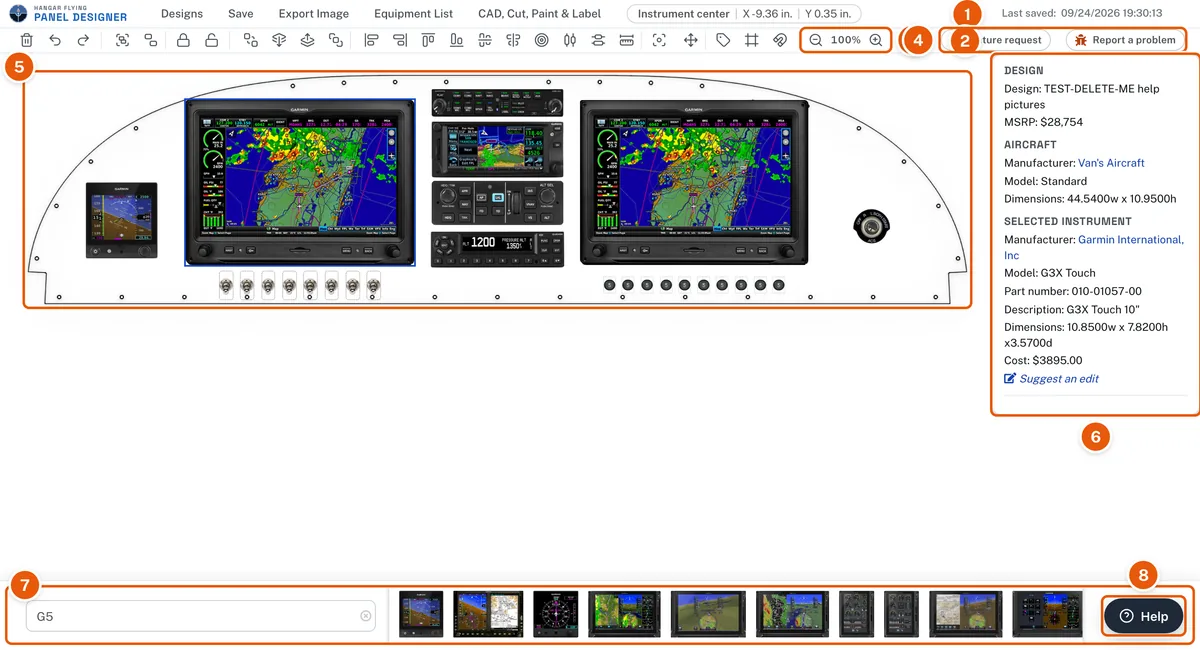
- The menu bar
- The tool row
- Zoom
- Feature request and Report a problem
- The panel template and the instruments on it
- The information box
- The instrument search
- Help, which opens these articles and answers questions
The menu bar (top of the designer)
- Designs goes back to My designs.
- Save saves your work. The designer also saves by itself every 15 minutes.
- Export Image makes a picture of your panel with a link you can copy or a file you can save.
- Equipment List opens your equipment list in a new tab, where you can add items and download it as a PDF.
- CAD, Cut, Paint & Label sends your finished design to our shop to be cut, painted and labeled.
- Report a problem, the bug icon at the right end of the tool row, sends us a picture of your canvas and a few words. See Report a problem.
- Feature request, the lightbulb to its left, is for what you would like added or changed. See Report a problem.
- The X / Y readout shows the cursor's position in inches, measured from the center of the panel template: X is positive to the right and negative to the left, Y positive up and negative down. Click an instrument and the same readout shows Instrument center, the position of that instrument's center measured the same way, so X 0.00, Y 0.00 is dead center on the panel. Premium feature
- Last saved shows when the design was last saved.
- The information box at the right of the canvas leads with the Design section: the design's name and a running MSRP of the instruments on the panel. Below it are the aircraft and the template's dimensions, and, when an instrument is selected, that instrument's manufacturer, model, part number, dimensions and cost. A dash means the value is not known; the cost is left out when there is no price.

The tool row (one row under the menu bar, in the order the work happens). A tool that needs a selection says so in a short note at the right of the row.
- Delete the selected instruments, placards or lines. The Delete or Backspace key on your keyboard does the same.
- Undo and Redo step back and forward through every move, add, delete, lock, nudge, placard and construction line, at any zoom. The keyboard works too: Ctrl+Z undoes and Ctrl+Shift+Z or Ctrl+Y redoes (on a Mac, Command+Z and Command+Shift+Z). Premium feature
- Group and Ungroup instruments so they move together. Premium feature
- Lock and Unlock an instrument so it cannot be moved by accident. Premium feature
- Arrange: Send To Back, Send Backward, Bring Forward, Bring To Front. Premium feature
- Align: Align Left, Right, Top, Bottom, Center Vertically, Center Horizontally, Align Centers. Distribute Horizontally or Vertically spaces three or more instruments with equal gaps, and Distribute Across a Total spreads them evenly over a width or height you enter in inches. Premium feature
- Move: Center On Panel, and Move / Space Items by a direction and a distance. The arrow keys nudge the selection a hundredth of an inch (Shift: a tenth). Premium feature
- Placard, the tag: words on the panel, on an instrument or on their own, in the font, colors and border you choose. Select one instrument and click it to add a placard to that instrument; with nothing selected it places a placard on its own; with several placards selected it changes them together. See Placards. Premium feature
- Construction Lines: Add Horizontal, Add Vertical, and the eye that shows or hides them. Premium feature
- Snap-To, which snaps an instrument you are dragging to the template's edges, to the instruments near it and to construction lines. A red slash across the magnet means it is off. Premium feature
- Zoom: the minus and plus magnifiers zoom the panel in 10% steps; the percentage between them fits the panel to the window. See Zoom and scroll.
The instrument search (the bar along the bottom) finds instruments by manufacturer, model, part number or keyword as you type. The results appear to the right of the box. Click one to see its details and add it; double-click one to add it straight away. Subscribers can also add several at once in rows. Premium feature Instruments are no longer dragged in from the results; once on the panel, they move by dragging.
Help, the button at the bottom right of every page and of the designer, opens these articles. Search them, or type a question and it is answered from the articles.
My designs lists your saved designs. From there you create, open, rename, copy and delete designs, and download or copy the link of a design's latest export.
Equipment Library (under Panel Designer in the main menu) lists every instrument and panel template in the designer, searchable by manufacturer, model or keyword.
Select an instrument or a placard by clicking it; hold Shift (or Ctrl, or Command on a Mac) and click to select several. The selection stays after Align, Distribute, Arrange, Group and Lock, so you can use one tool after another on the same instruments. See Select, group and ungroup instruments.
Hold Shift while dragging to move an instrument only horizontally or only vertically. Premium feature
Keyboard shortcuts for selecting, nudging, deleting, undoing, zooming and the search are listed in one place. See Keyboard shortcuts.
What changed recently is listed on the What's new page, linked from the menu and the foot of every page.
Create a new panel design
Sign in, then click My designs at the top right, or choose My designs under Panel Designer in the main menu.
Click New panel design. On the next page:
- Enter a Design name, for example "RV-10 IFR panel".
- Extra space above the panel and Extra space below the panel start at Yes, 1 inch each, which gives you room to work around the template. Change the inches, or choose No for none.
- Pick the Panel template for your aircraft from the list on the right. Type in the search box to shorten the list: a manufacturer, a model or a keyword. Hyphens and spaces do not matter, so "rv3", "RV-3" and "rv 3" all find the RV-3. The pictures are large enough to tell similar templates apart.
- Click Open the designer.
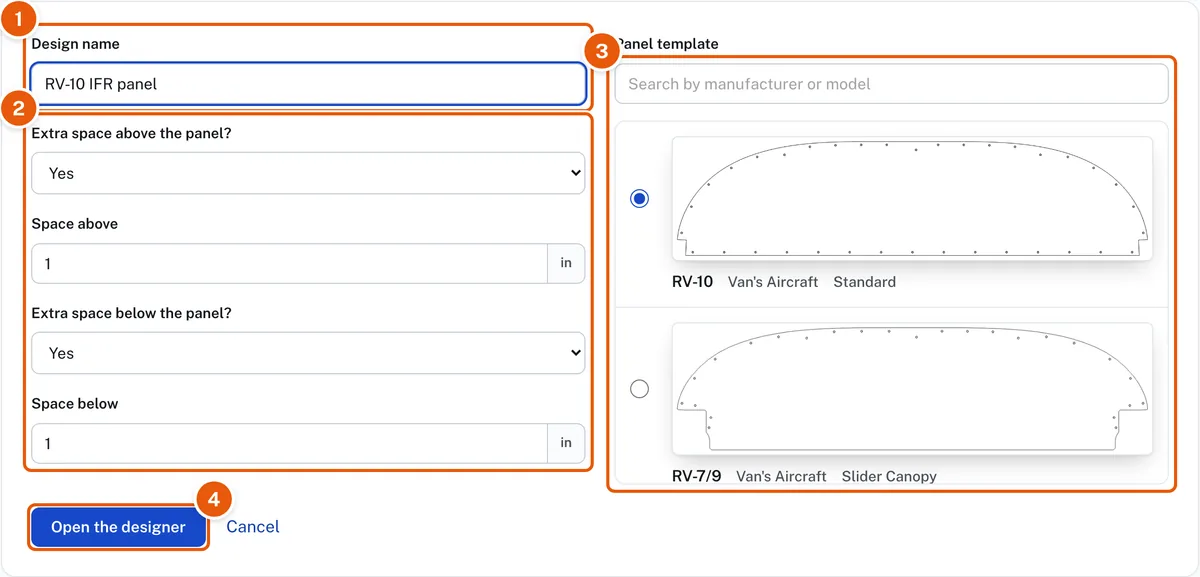
The designer opens with your panel template filling the window. Add and arrange instruments, and use Save in the menu bar before you leave.
Start from your aircraft's page instead. Open Panel templates under Panel Designer in the main menu, choose your aircraft, and click a template's card. The New panel design page opens with that template selected at the top of the list, and all that is left is the design name. See Panel templates by aircraft.
If your aircraft is not listed, use Upload its panel template at the foot of the page. See Upload your own panel templates and instruments.
Open a panel design
Sign in, then click My designs at the top right, or choose My designs under Panel Designer in the main menu. Your saved designs are listed with a picture of the design as last saved, the date last saved, the aircraft and the list price of the instruments on it, in whole dollars. A design that has never been saved from the designer shows "No picture yet. Open the design and save it."
To find one design among many, type part of its name in the search box above the list. Click the design's row to open it in the designer.
On a phone, My designs shows each design's picture and name; tapping one opens the picture to save or share. See Phones and tablets.
Save a panel design
Click Save in the menu bar at the top of the designer. Saving an existing design replaces the previous version, and refreshes the picture of it on My designs.
The designer also saves your work by itself every 15 minutes, but save before you close the page.
Your saved designs are listed on My designs: click My designs at the top right, or choose it under Panel Designer in the main menu.
Rename, copy and delete panel designs
Sign in, then click My designs at the top right, or choose My designs under Panel Designer in the main menu.
Each design is a card: its picture, its name, the aircraft and the day it was last saved, and the equipment's MSRP. Click anywhere on a card, outside its buttons, to open the design. Use Search to find a design by name or aircraft, and Sort by to put the newest, the name, the aircraft or the highest MSRP first.
The buttons along the foot of each card are icons. Point at one to see its name.
- Rename (the pencil) asks for a new name.
- Copy the design (two stacked pages) asks for a name for the copy. Open the copy and save it once so it gets its own picture. The copy does not have the design's placards yet.
- Download latest export (a picture with a down arrow) saves the picture you last exported from that design.
- Copy link (the chain link) copies a link to that picture.
- Compare (two panes side by side) lets you pick two designs and view them side by side.
- Delete (the trash can, at the right end) asks you to confirm, then removes the design for good.
Until a design has been exported, Download and Copy link show faintly and do nothing.
On a phone or a small tablet the designer does not open, so tapping a card opens its picture to save or share instead. Rename, Copy the design, Download, Copy link and Delete work there too; Compare is on a computer only.
Add a single instrument
Open the design you want to work on.
Find the instrument. Type in the Search instruments by keyword box in the bar along the bottom of the designer: a manufacturer, model, part number or any word from the instrument's name. Matching instruments appear to the right of the box as you type; scroll the row sideways to see them all.
Put it on the panel. Instruments are added by clicking, not by dragging them in from the list. There are two ways:
- Click it, then Add. Clicking an instrument in the results opens a card with its manufacturer, model, part number, size, weight and notes. Press Add, and the instrument follows your pointer at its true size. Click on the panel where you want it; it goes down centered on that point. Hold Shift while you click to put down more than one; press Esc to stop. This works at any zoom and on a touch screen.
- Double-click it to add one straight away. It goes a quarter inch to the right of the last instrument you added, level with it, so double-clicking a switch four times gives you a row of four. The first one you add goes in the middle of what you can see.


To put down a block of the same instrument in rows, see Add several instruments at once.
Move it. Once it is on the panel, press and hold on the instrument, drag it to its new place, and release. For finer placement, zoom in first; see Zoom and scroll.
See its details. Click an instrument on the panel, or in the search results, and its details appear in the column on the right (and, in the results, on the card as well). Click an empty part of the panel template to see the template's details instead.
Add several instruments at once
To add a row or a block of the same instrument, for example twenty circuit breakers:
- Search for the instrument.
- Click it in the search results. A card opens with its details.
- Press Add several… and enter the Rows, the number Per row, and the Gap across and Gap down in inches. The gaps are the space between one instrument and the next, edge to edge. For two rows of ten breakers a quarter inch apart: 2, 10, 0.25 and 0.25. The card shows how many that makes and how big the block will be, and remembers your numbers for next time.
- Press Place. The whole block follows your pointer; click on the panel where the middle of the block should go.

The block goes down as one group, at the spacing you entered, and one Undo takes it all off again. You can place up to 200 instruments at a time.
Select, group and ungroup instruments
Select an instrument by clicking it once; a thin blue box shows it is selected. Clicking another instrument selects that one instead. To select several, hold Shift (or Ctrl, or Command on a Mac) while you click each one; Shift-clicking a selected instrument takes it out of the selection. Click an empty part of the panel to clear the selection. The selection stays after you use a tool, so you can align a row, then distribute it, then nudge it with the arrow keys without selecting it again.

Group selected instruments with Group in the tool row (1 in the picture). A group moves, aligns and locks as one.
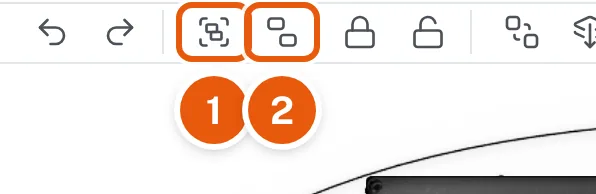

Ungroup by selecting the group and clicking Ungroup (2 in the picture). The instruments are separate again.
Send to back, bring to front
When instruments overlap, the four Arrange buttons in the tool row set which one is on top. Select the instrument and click:
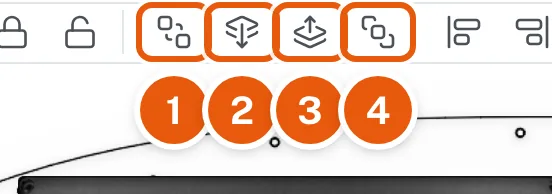
- Send To Back moves it all the way down, under everything else.
- Send Backward moves it down one step.
- Bring Forward moves it up one step.
- Bring To Front moves it all the way up, over everything else.
Point at a button to see its name.
Lock and unlock instruments
Once an instrument is where you want it, select it and click Lock in the tool row. A locked instrument does not move when dragged, aligned or nudged, so you cannot knock it out of place while working on the rest of the panel.

Lock works on several selected instruments at once and on a group.
To move a locked instrument again, select it and click Unlock. Lock and Unlock leave the instrument selected, so you can press one straight after the other.
Snap-to
With snap-to on, an instrument you drag snaps into line with the instruments near it, and onto any construction line it comes close to, which keeps rows straight and spacing even. See Construction lines. Click the magnet in the tool row to turn it on or off. A red slash across the magnet means it is off.
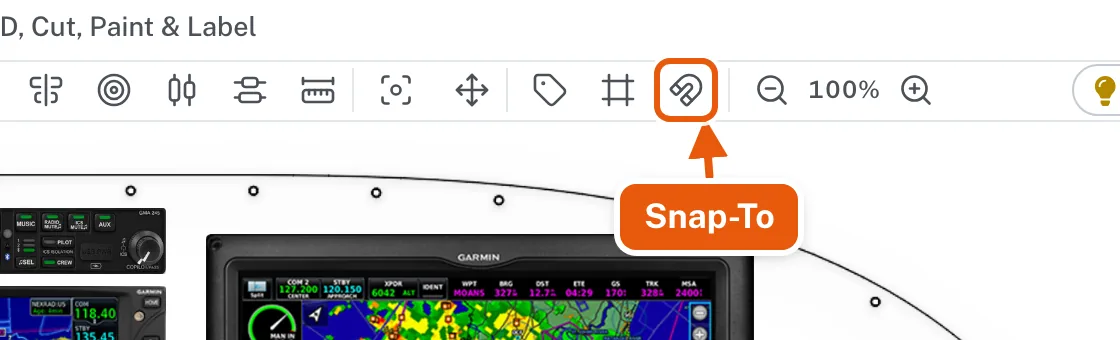
Turn it off when you need to place something freely, then turn it back on. While it is off, nothing snaps, instruments you add in the meantime included.
Construction lines
Construction lines are guide lines for lining things up. They do not appear in an exported picture.
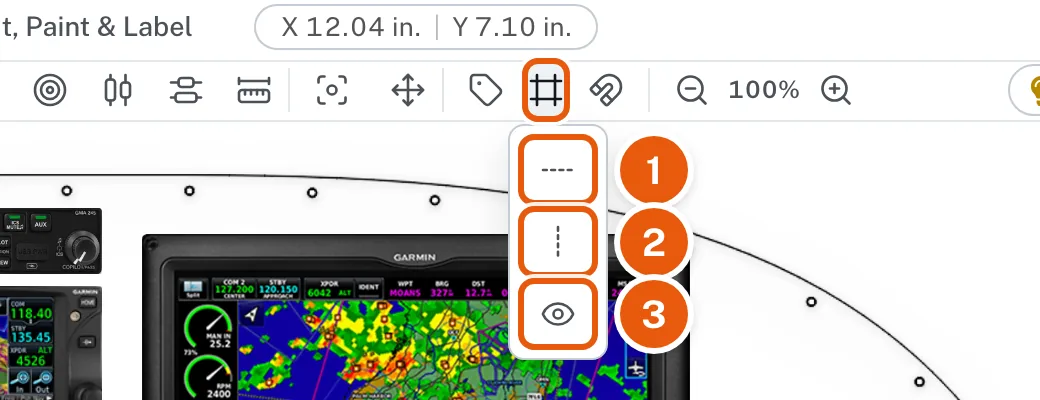
- Show or hide them: click Construction Lines in the tool row, then the eye. Lines are hidden when a design opens, saved ones included, until you press the eye. While they show, the eye has a slash through it; press it to hide them again.
- Add one: click Construction Lines, then Add Horizontal or Add Vertical. A new line starts at the center of the panel. Add as many as you need. Adding one shows all the lines if they were hidden.
- Select one: click it; it turns blue. Click another to add it to the selection. Click anywhere else on the panel to deselect them all.
- Move one: drag it. The line takes the pointer from a few pixels either side, so you need not hit the dashed line exactly. For an exact position, select it and use Center On Panel or Move / Space Items, the same as for an instrument. Zoom in for finer control; see Zoom and scroll.
- Delete one: select it and click Delete in the tool row.
- Snap to one: with snap-to on and the lines showing, drag an instrument toward a line. When an edge or the center of the instrument comes within a few pixels of the line, it is pulled onto it and the line turns blue. Drop it there and it is exactly on the line.

Center an instrument on the panel
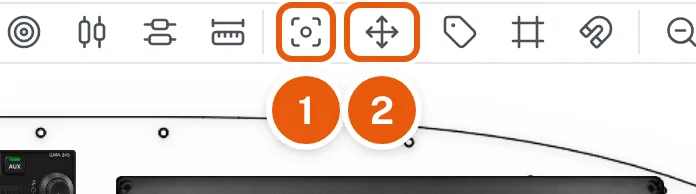
Select the instrument and click Center On Panel in the tool row (1 in the picture).
The instrument moves to the exact center of the panel, both across and up and down. It works on a construction line too.
Move instruments by direction and distance
To move an instrument or construction line by an exact amount:
- Select it.
- Click Move / Space Items in the tool row (2 in the first picture). The Horizontal / Vertical Spacing box opens.
- Choose the direction (1 in the second picture) and enter the distance in inches (2).
- Click Move (3).
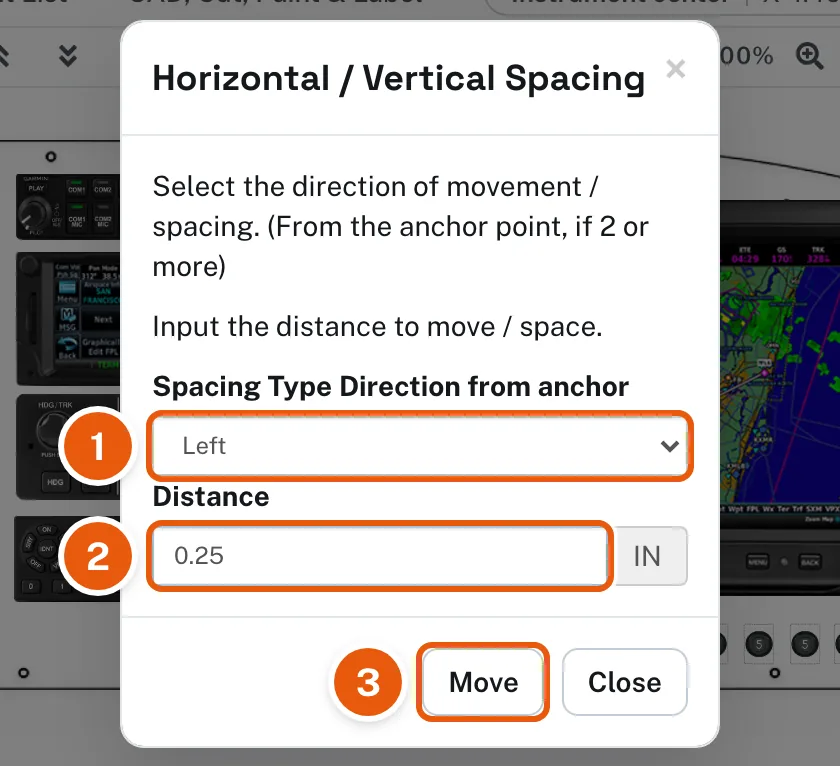
Use it for fine adjustments and for spacing a row of instruments evenly.
Arrow keys. With an instrument selected, the arrow keys on your keyboard move it a hundredth of an inch. Hold Shift for a tenth of an inch. Zoom in first for the finest control. Locked instruments stay put.
Move an instrument straight across or straight up and down
Hold the Shift key, then press on the instrument and drag. The movement locks to the direction you start dragging in, across or up and down, so the instrument stays in line. Release the mouse button, then the Shift key.

Align two instruments on their centers
Select the instrument that should stay put first (the anchor), then Shift-click the ones to move. Click Align Centers in the tool row (7 in the picture).
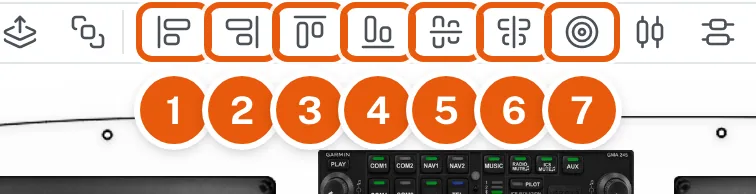
The selected instruments move so their centers sit on the anchor's center, across and up and down.
Align instruments
Click the instrument that should stay put first (the anchor), then Shift-click the ones to move. Then click one of the seven Align buttons in the tool row:
- Align Left (1), Align Right (2), Align Top (3) or Align Bottom (4) lines up that edge with the anchor's.
- Center Vertically (5) moves the others up or down so their centers are level with the anchor's center.
- Center Horizontally (6) moves them across so their centers line up above or below the anchor's center.
- Align Centers (7) does both.
Point at a button to see its name.

Distribute instruments evenly
Three buttons to the right of the Align buttons space a row or a column of instruments evenly. The order you select them in does not matter.
- Distribute Horizontally: select three or more instruments. The leftmost and the rightmost stay where they are, and the ones between move across so the gaps between neighbors, edge to edge, are all the same.
- Distribute Vertically does the same up and down: the top and bottom instruments stay put.
- Distribute Across a Total: select two or more instruments and a box opens. Choose Across or Up and down and enter the Total width (or Total height) in inches, measured from the first instrument's leading edge to the last one's far edge. The box starts with what the selection measures now. The leftmost (or top) instrument stays where it is; the others are spaced evenly so the whole row measures exactly that total. If the total is less than the instruments measure side by side, the box says so and nothing moves.
The instruments stay selected after an Align or Distribute button, so you can line a row up and then space it without selecting it again.

A group moves as one piece and keeps its own layout. A locked instrument stays where it is and is left out of the spacing. Undo puts everything back in one step.
Export the equipment list
A design needs at least 3 instruments before its equipment list opens.
Click Equipment List in the menu bar. The designer saves your design first, then your equipment list opens in a new tab. The tab says "Saving your design…" for a moment while that happens.
Each line is one instrument, with Qty, how many of it are on the panel. Six identical toggle switches are one line with a Qty of 6.
On that page:
- Add equipment adds items that are not on the panel. Search for them and add them to the list. Each one you add has its own Qty, starting at 1; type a whole number from 1 to 999. Adding the same item again raises its Qty by one.
- Download as PDF saves the list: your name, aircraft and design, a picture of the panel, and every item with its quantity, manufacturer, model, part number and description. No prices.
- Back to the designer closes the tab and returns you to your design.
To have the panel fabricated, use CAD, Cut, Paint & Label in the designer's menu bar instead. See Request a quote: CAD, cut, paint and label.
Upload your own panel templates and instruments
Ask us to add one
If the panel template or instrument you need is not in the designer, contact us with the aircraft or the instrument's manufacturer and model. Anything we add is available to everyone.
Upload your own
Sign in and open Upload a panel template or Upload an instrument. Both are also reachable from My designs and from the foot of the Equipment Library page.
Fill in the manufacturer, model and variant, the size in inches, and choose the picture. The page lists what the picture needs to be, and the box shows your picture before you send it. Fields marked optional can be left empty. Click Send for review.
What you upload is available to you right away. We check every upload for accuracy and picture quality; ones that pass are added to the library for everyone.
Your uploads
Panel templates and Instruments list what you have uploaded, one card each, with its picture and whether it is In the library or Waiting for our review. Click a card, or its pencil, to change it; the trash can deletes it. The search box and Sort by sit above the cards.
What the picture needs to be
- A PNG with a transparent background, so the instrument or panel sits on the template without a white box around it.
- 72 pixels per inch, so one inch of instrument is 72 pixels. A 3⅛-inch instrument is 225 pixels wide; a 2¼-inch instrument is 162.
- Cropped to the outline, with nothing around it. Extra space throws off placement and alignment.
- For an instrument, the front picture is the face as installed and the front cutout is the hole it needs in the panel; side and back pictures are optional.
- Use an image editor to size, crop and clear the background.
Phones and tablets
The Panel Designer needs a wide screen. Laying out a panel to scale takes room, so the designer opens on a computer, or on a tablet held sideways that is at least as wide as an iPad mini in landscape (about 1,000 pixels across). On anything narrower, a phone or a small tablet held upright, you get a page that says so, with links to what you can do there. On a tablet, turn it sideways and open the designer again.
On a phone you can
- Browse Featured designs, Panel templates by aircraft and the Equipment Library. The home page is the same one a computer shows, in one column.
- Open My designs: each design is a card with its picture and its name. Tap a card to Open picture, Save picture or Share it with your phone's own share sheet (Messages, Mail, Facebook and so on). Renaming, copying, deleting and starting a new design are done on a computer.
- Answer our shop: open a CAD, Cut, Paint & Label request, read the price and the messages, and accept, ask for changes or decline.
- Manage My account, your Subscriptions and your card, and read Help and What's new.
A design that has never been opened and saved on a computer has no picture yet.
For designing on a tablet we recommend
- A screen of 10 inches or more.
- A mouse (or trackpad) and keyboard connected to the tablet. Dragging and selecting with a finger is possible but imprecise.
- To add an instrument with a finger, tap it in the search results, tap Add, then tap the panel where it goes.
An iPad Air or iPad Pro with a keyboard and mouse works well.
If something does not work on your device
- Turn the tablet sideways and reload the page.
- Update the device's operating system and browser.
- Try a mouse and keyboard.
- If it still does not work, contact us with the device, the browser and what happened.
Pop-up blocked
Equipment List and CAD, Cut, Paint & Label open a new tab the moment you click them, so browsers do not normally block it. If yours does, the designer shows a notice with an Open Window link that opens the same page. Click it.
To stop it from happening again, click the blocked pop-up icon in the address bar, choose Always allow pop-ups and redirects from https://hangarflying.com, and click Done. That allows pop-ups on Hangar Flying only. A browser extension that blocks pop-ups may need the same allowance.
Request a quote: CAD, cut, paint and label
A finished design can be fabricated as a panel. What the service is, with pictures of finished panels.
Our shop draws it in CAD, cuts it, paints it and labels it. The request goes from the designer; our shop prices it; you accept or ask for changes on your own request page.
Send the request
- Click CAD, Cut, Paint & Label in the menu bar (the design needs at least 3 instruments). The designer saves your design, then the request page opens in a new tab with your equipment list and the form. (Equipment List in the menu bar opens the list alone, where you can add equipment and download it as a PDF.) Back to the designer on either page closes the tab.
- Check the list. Each line shows its Qty, how many of that item are on the panel. Add equipment adds items that are not on the panel, each with a Qty you can set from 1 to 999. Our shop receives the quantities with the list; no prices are shown or sent.
- Fill in the form: your name, email, phone and address, your home airport, the aircraft make and model, and anything our shop should know about the panel. The more detail you give, the more complete the quote.
- Check the box to agree to the terms and click Send the request, then confirm. You will see "Thank you. Your request is with our shop."
What happens next
- Our shop receives your design, your equipment list and your details, and prices the work. This can take a few days.
- My designs shows a notice for each open request with a button to its request page. You also receive an email when the price is ready, with the same link.
- On the request page you see the design, the template and aircraft, when it was sent and its status, our shop's price and notes, and the messages between you. Accept this price, Ask for changes or Decline this request from there, and write to our shop in Messages.
- The request page works on a phone, so you can answer our shop from your phone.
- Once you accept, our shop arranges the work and payment with you through the same page.
We do not pass your details to anyone without your permission. Checking the box allows us to give this information, one time, to our shop for this request.
Zoom and scroll
When a design opens, the panel template fills the window from the left edge to the column on the right. Everything on it, template and instruments, is drawn to the same scale, and it stays that way when you change the size of your browser window.
Zoom in for finer placement. Use the magnifiers at the right end of the tool row: the minus zooms out and the plus zooms in, in 10% steps, from 50% to 400%. Or hold Ctrl (Windows) or Command (Mac) and roll the mouse wheel over the panel; the panel zooms around the point under the cursor.
Fit it back to the window. Click the percentage between the two magnifiers.

Scroll. When the panel is bigger than the window, or an instrument or a placard hangs past an edge of the panel, drag the scroll bars or roll the wheel to move around it. The canvas scrolls past every edge of the panel, the top and left edges too. The column on the right stays where it is, and the panel scrolls under its edge; it never covers the column.
Zoom changes only what you see. An instrument's position and size on the panel are the same at every zoom, and so is what is saved and what is exported.
Report a problem
If something in the designer does not do what you expect, click the bug icon, Report a problem, at the right end of the tool row.
- Type what happened and what you expected.
- Click Send report.
The report carries a picture of your canvas at that moment and the details we need to look into it: which design, where everything was, your zoom, your browser and window size, and any script errors the page saw. Nothing else from your computer is sent. We get it by email and reply to the address on your account.
Feature request
To ask for something new or changed, click the lightbulb, Feature request, to the left of Report a problem. Tell us what you would like the Panel Designer to do and what you are trying to get done, then click Send request. The same picture and details go with it. We read every request and reply to the address on your account.
Panel templates by aircraft
Panel templates, under Panel Designer in the main menu, lists the aircraft in the template library by manufacturer. Click an aircraft to open its page.
An aircraft's page shows
- Every panel template for that aircraft on one page: the aircraft manufacturer's templates and those from panel manufacturers such as Aerosport Products and Hangar Flying. Each card gives the template's manufacturer, what sets it apart (for example "Tip-up Canopy" or "Tall panel with centerlines"), its width and height in inches, and how many panels have been laid out on it.
- A Van's RV and its A model (the RV-8 and the RV-8A, for example) have the same panel and share one page, named for the model without the A.
- The number of panels laid out on the aircraft's templates.
- The newest exported designs for the aircraft. Designs are shown without names or registration numbers.
- The equipment builders install most often in that aircraft's panel.
Start a panel layout from a template
- Sign in on a computer, or on a tablet held sideways.
- Open the aircraft's page and click the template's card.
- The New panel design page opens with that template selected at the top of the Panel template list.
- Enter a Design name and click Open the designer.
If you are not signed in, the card opens Create an account. On a phone the designer does not open; see Phones and tablets.
If your aircraft has no page
An aircraft's page appears once 10 panels have been laid out on its templates. Until then, pick the template on the New panel design page; see Create a new panel design. If the library has no template for your aircraft, see Upload your own panel templates and instruments.
From our Facebook page
A design posted on the Hangar Flying page on Facebook links to that aircraft's page with the design shown at the top. From there, Create an account or, signed in on a computer, Start a panel layout on this template opens the New panel design page with that design's template selected.
From Featured designs
Each featured design is labeled with the aircraft's manufacturer and model. → See more beside the label opens that aircraft's page. Click the picture to see the design at full size.
Placards
A placard puts words on the panel: the name of a switch, a breaker or a control, such as BOOST PUMP or AVIONICS MASTER, or a placard of its own, such as the passenger warning. Placards are drawn to scale and appear in every picture of the panel: the ones you export, the one on the Equipment List, and the one sent with a CAD, Cut, Paint & Label request.
Add a placard to an instrument. Click the instrument once to select it, then click Placard, the tag in the tool row. The placard appears just below the instrument, or above or beside it where it would not fit on the panel below, and its box opens. Type the words, then press Enter or click Done. Until you choose a side or a distance, the placard moves to a side where it fits if its words grow too long for the one it is on. The placard moves with its instrument however the instrument is moved, and is deleted with it.

A span placard across a row. One placard bracket for a whole row of switches, such as OFF under a row of toggle switches, or CABIN HEAT over a row of knobs. Click the first switch, Shift-click each of the others (or click a group), then click Placard. Type the words, such as OFF, and press Enter. The words are centered under the row, and a solid line runs from the first switch to the last, broken around the words, with each end turned up toward the switches like an L. The span placard fits itself to its row whenever a switch in it is moved, aligned or spaced, and when a switch in it is deleted it spans the ones left; with only one left, it becomes a placard on its own. Select instruments one above another and the span placard runs down the column, to its right. Double-click it to change it: it has every setting of a placard, and also:
- Side: Below or Above the row (Right or Left of a column). The ends always turn toward the instruments.
- Distance from instruments: from the row's lowest edge (highest, above it) to the letters.
- Bracket height: how tall the turned-up ends of the line are: None, 1/16, 1/8 (the standard) or 1/4 in, or any other height under Other.
- Ends: End centers, at the centers of the first and last instruments (the standard), or Past the outer edges of the row, by 1/8 in to start or any distance you type.

Place a placard on its own. With nothing selected, click Placard. The placard starts in the middle of the part of the panel you can see and is not attached to anything. Drag it where it goes. To unhook a placard from its instrument, click Stand alone in its box: it stays where it is and no longer moves with the instrument.
Every new placard starts fresh, with the standard font, letter height, colors and border. To give a row of placards the same look, select them all (click the first, then Shift-click the others) and change them together in one box.
Change a placard. Double-click it. The box has:
- Text: the words. Press Shift+Enter to start a new line, for a placard of several lines such as the passenger warning.
- Font: Sans, Condensed, Geometric, Mono or Grotesk. Condensed fits more words in a narrow row of switches.
- Letter height: the height of the capital letters, whatever the font: 3/32, 1/8, 3/16, 1/4, 1/2 or 1 in, or type any other height up to 3 in under Other, as a decimal or a fraction, for a registration number on the panel.
- Justify: Left, Center or Right.
- Box size: the placard's width and height, in inches, as a decimal or a fraction. Leave either empty (Auto) and the placard is as wide or as tall as its words. With a width, the words wrap onto new lines by themselves; with a height, they are centered top to bottom. When the placard has a border or a background, the border and background are drawn at that size.
- Text color: black, white, red, yellow, gray, blue or green, or the last square for any other color.
- Background: none (the panel shows through), one of the same colors, or any other.
- Border: none, square or rounded. The border is drawn in the text color.
Move the box out of the way. Drag it by its title bar. It stays where you put it for every placard after, until you reload the page.
For a placard on an instrument, the box also has:
- Side: Above, Below, Left or Right of its instrument. A placard at the left or right reads across and ends, or starts, toward the instrument.
- Distance from instrument: in inches, from the instrument's edge to the letters, or to the placard's edge when it has a border or a background. The minus and plus change it by 1/32 in, or type a distance as a decimal or a fraction, such as 0.1 or 1/16.
- Stand alone: unhooks it from the instrument.
Change several placards at once. Select the placards: click the first, then Shift-click each of the others. Then click Placard. One box opens for all of them: the font, letter height, justification, box size, colors and border you choose are set on every one. For placards that are all on instruments, the side and distance can be set too, and for span placards their bracket height and ends. Delete in that box deletes all of them. Undo takes back the whole change in one step.
Move a placard. Drag it, or select it and use the arrow keys. You can drag a new placard before you have typed its words. A placard on an instrument stays attached: it keeps its new place and still moves with the instrument. When a placard and its instrument move together, in a group or a selection, the placard keeps its side and distance.
At the edge of the panel. A placard can hang past the edge of the panel, as an instrument can: when its instrument is close to the edge, or when it is moved there. The part of a placard past the edge is not in pictures of the panel. The canvas scrolls to it past any edge: scroll up or left to see a placard past the top or left edge. To bring it back, drag it onto the panel, change its side or its distance in its box, or move its instrument.
Use the other tools on placards. Select placards on their own or together with instruments, the same way you select instruments. Align, center, Move / Space Items, the arrow keys, Group, Lock, the Arrange tools, Undo and Redo work on them as they do on instruments. Snap-To works on a placard dragged by itself.
Delete a placard. Select it and click Delete in the tool row or press the Delete key, or click Delete in its box. While you are typing a placard's words, the Delete, Backspace and arrow keys change only the words.
Placards are saved with the design, including where they sit in front of or behind instruments. A design holds up to 500 placards, each up to 12 lines and 600 characters, with letters from 1/32 in to 3 in high. A copy of a design does not have its placards yet: neither a copy made with Copy in My designs, nor the working copy our shop makes from a CAD, Cut, Paint & Label request. Your own design keeps its placards.
Keyboard shortcuts
The keys the Panel Designer answers to. On a Mac, press Command where this says Ctrl. The keys act on the panel only while you are not typing in a box: in the instrument search, a placard's words or a number field, they type as usual.
Selecting
- Click an instrument or a placard to select just that one.
- Shift+click (or Ctrl+click, or Command+click on a Mac) adds an instrument or a placard to the selection, or takes it out. See Select, group and ungroup instruments.
- Click an empty part of the panel to clear the selection.
Moving
- Arrow keys nudge the selection a hundredth of an inch (0.01 in). Premium feature
- Shift+arrow keys nudge it a tenth of an inch (0.1 in). Premium feature
- Shift+drag moves an instrument only across or only up and down, in the direction you start in. See Move an instrument straight across or straight up and down. Premium feature
Deleting, undoing and redoing
- Delete or Backspace deletes what is selected.
- Ctrl+Z undoes. Premium feature
- Ctrl+Shift+Z or Ctrl+Y redoes. On a Mac, Command+Shift+Z. Premium feature
Adding instruments
- S jumps to the instrument search, emptied, ready to type.
- Shift+click on the panel, while an instrument follows your pointer after Add, puts one down and keeps going, so you can put down several.
- Esc stops placing. Pressed again, it closes the instrument's card.
Placards
- Enter finishes the words and closes the placard's box.
- Shift+Enter starts a new line.
- Esc closes the placard's box.
See Placards.
Zoom
- Ctrl+mouse wheel over the panel zooms in and out around the point under the pointer. See Zoom and scroll. Premium feature
Help
- Esc closes the Help window.
Hangar Flying website
Edit or update my account information
Sign in, open your name at the top right and choose My account, or go straight to hangarflying.com/account.
Account settings has two columns, About you and Address. Fields marked optional can be left empty; every other field is needed. Click Save changes.
The tabs across the top lead to Subscriptions and Change password. Click the picture above the form to change your account icon.
Add or change my account icon
Sign in and go to your My Account page. Click Click To Change Image under the icon and choose a picture from your computer.
For the best result use a square PNG with a transparent background, 256 × 256 pixels or larger.
Change my password
If you cannot sign in
Click Forgot your password? on the sign-in page, enter your email address, and follow the link in the email you receive.
If you are signed in and want a new password
Go to Change Password under My Account, enter your current password and the new one, and save.
Cannot sign in
If you cannot sign in and resetting your password (see Change my password) has not helped, your account may be locked.
Contact us with the email address on the account and we will unlock it.
If you have just created an account and have not confirmed your email address, see Confirm my email address — you can start designing before you confirm, and you can send yourself a new link from the reminder at the top of the page.
Cancel my account
To close your Hangar Flying account, contact us from the email address on the account and we will close it.
If you have a paid subscription, you can turn off its renewal and remove your card yourself first under My Account → Subscriptions.
My subscription, card and invoices
Everything about a paid subscription is under My Account → Subscriptions.
Turn off renewal. Press Turn off renewal beside your subscription and confirm. Your subscription stays until the end of the year you paid for, then ends. Nothing more is charged. Until it ends, Turn renewal on puts it back.
Remove a card. Press Remove beside the card. You can remove a card at any time. If it is your only card and your subscription renews, removing it also turns off renewal; the page says so, with the date your subscription runs to, before you confirm.
Add or change a card. Press Add a card, enter the new card and press Save card. The new card is the one charged at renewal. With more than one card on file, Use for renewal chooses which card is charged.
Billing address. Press Change under Billing address.
Invoices. Every payment is listed at the bottom of the page with View and Download.
Terms and Privacy, and what changed in September 2026
The Terms and the Privacy notice are now one page, in plain language, covering hangarflying.com, the Panel Designer and MRO. The link is at the foot of every page.
What is new in it
- What you create here. Your designs stay yours. Hangar Flying may use what is created on the site, for example on the Featured designs page, in our advertising and in statistics, always without your name, email address, account or aircraft registration attached.
- Exported pictures are public. A picture you export or share sits at a public web address. Do not put anything on a panel picture that you would not want public.
- Subscriptions. Premium renews each year until you turn renewal off under My Account → Subscriptions. You can remove your card at any time; removing your only card turns renewal off, and your subscription runs to the end of the year you paid for.
- A design needs at least 3 instruments before it can be exported, shared, listed as equipment or sent to our shop.
- Our shop. CAD, Cut, Paint & Label sends your design and contact details to our shop, which prices its own work. We do not send equipment lists to avionics dealers.
- Planning aid, not approved data. Measure your own panel and equipment before anything is cut, and have the installation done and approved as the regulations for your aircraft require.
- Privacy. The page lists what we collect, which companies receive something (Stripe for payments, Amazon for hosting and email, Sentry for error reports, Anthropic for the Help button's answers) and how long we keep it. We count visits ourselves, without cookies and without Google Analytics. We do not sell personal information, and we do not use an outside mailing-list company.
- Age. 13 and over; under 18 with a parent's or guardian's agreement.
Site news by email can be turned off under My Account → Account settings, or with the one-click link in any announcement.
To close your account and have your personal information deleted, contact us from the email address on the account.
Confirm my email address
When you create an account we email you a link to confirm the address is yours.
You can start designing before you confirm. You have seven days from opening the account. A reminder sits at the top of every page until the address is confirmed, and your designs are kept whether you confirm or not.
The email has not arrived
- Look in your spam or junk folder. It comes from
support@hangarflying.com. - Press Send the link again on the reminder at the top of the page, or on the Check your email page.
The link says it has expired
Links last seven days. If yours has run out, that page has a Send a new link button.
You are signed in with a different address
That is fine — open the link anyway. It confirms the address it was sent to and tells you which one. Then sign in with that address.
Still stuck
Contact us with the email address you registered and we will confirm it for you.