
The Panel Designer lets you lay out an instrument panel on your aircraft's panel template, instrument by instrument, then export it, list its equipment or send it to our shop. This is what is there and where to find it.
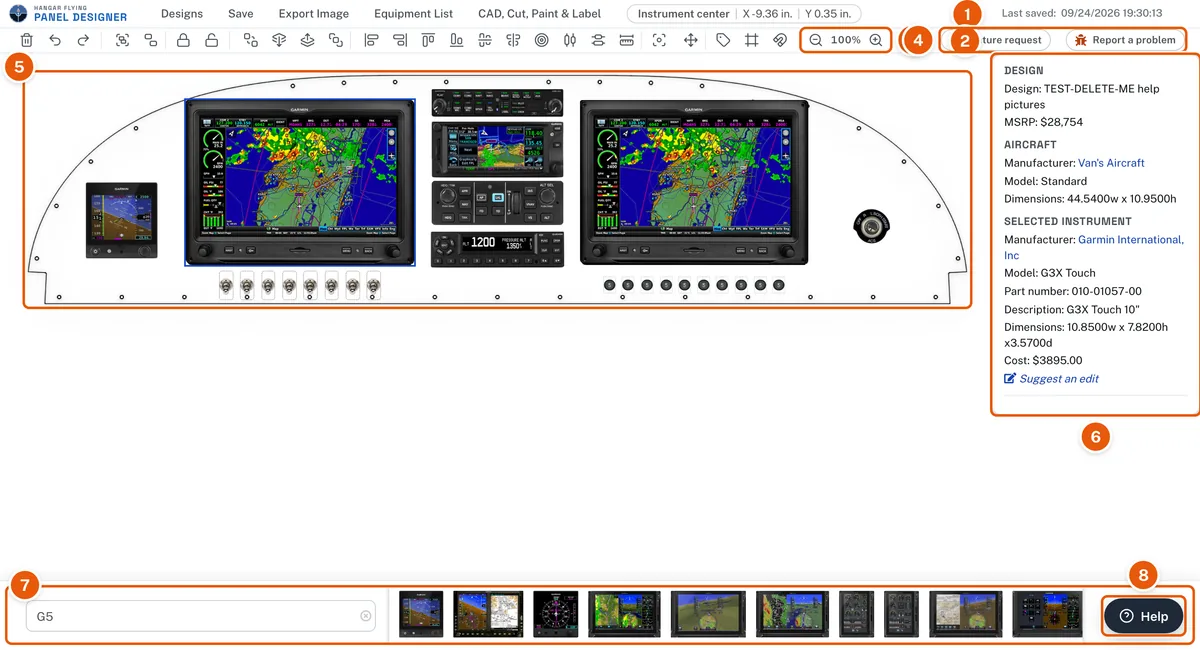
- The menu bar
- The tool row
- Zoom
- Support
- The panel template and the instruments on it
- The information box
- The instrument search
- Help, which opens these articles and answers questions
The menu bar (top of the designer)
- Designs goes back to My designs.
- Save saves your work. The designer also saves by itself every 15 minutes when something has changed. See Save a panel design.
- Export Image makes a picture of your panel with a link you can copy or a file you can save.
- Equipment List opens your equipment list in a new tab, where you can add items and download it as a PDF.
- CAD, Cut, Paint & Label sends your finished design to our shop to be cut, painted and labeled.
- Add to my build puts the design's instruments on your aircraft's equipment list. See Add to my build. Member tool
- In a window narrower than 1,600 pixels the bar uses short names: Export, Equipment, CAD & Cut and Add to build. They are the same buttons.
- Zoom, beside CAD, Cut, Paint & Label: the minus and plus magnifiers zoom the panel in 10% steps; the percentage between them fits the panel to the window. See Zoom and scroll.
- The X / Y readout shows the cursor's position in inches, measured from the center of the panel template: X is positive to the right and negative to the left, Y positive up and negative down. Click an instrument and the same readout shows Instrument center, the position of that instrument's center measured the same way, so X 0.00, Y 0.00 is dead center on the panel. Member tool
- Last saved shows when the design was last saved.
- The information box at the right of the canvas leads with the Design section: the design's name. Below it are the aircraft and the template's dimensions, and, when an instrument is selected, that instrument's manufacturer, model, part number, description and dimensions. MSRP and Cost read "Coming soon" while the library's prices are brought up to date. Under a selected toggle switch, circuit breaker, knob or display is a button that changes its color, rating, size or screen; see Toggle switches and circuit breakers and Choose a display's size, model and screen.
- Support, at the top of the information box: report a problem or ask for a feature. A picture of your canvas and a few words go to us. See Support: report a problem or ask for a feature.

The tool row (one row under the menu bar, in the order the work happens). A tool that needs a selection says so in a short note at the right of the row. Every tool is in the row for everybody: without a membership the member tools show grayed out, and pressing one says how to become a member. A new account has every tool for 14 days; see Every tool for 14 days, then membership. After that, without a membership, a design opens to look at: the tools, the search, Save and Export are grayed out. A tool that is new to you pulses. Click it for a short tour on your own panel, or close the tour with the ×; it does not come back. See Tours of new tools.
- Delete the selected instruments, placards or lines. The Delete or Backspace key on your keyboard does the same.
- Select several: while it is lit, each click or tap adds an instrument to the selection or takes it out, without holding Shift. See Select, group and ungroup instruments.
- Undo and Redo step back and forward through every move, add, delete, lock, nudge, placard and construction line, at any zoom. The keyboard works too: Ctrl+Z undoes and Ctrl+Shift+Z or Ctrl+Y redoes (on a Mac, Command+Z and Command+Shift+Z). See Undo and redo. Member tool
- Group and Ungroup instruments so they move together. Member tool
- Lock and Unlock an instrument so it cannot be moved by accident. Member tool
- Arrange: Send To Back, Send Backward, Bring Forward, Bring To Front. Member tool
- Align: Align Left, Right, Top, Bottom, Center Vertically, Center Horizontally, Align Centers. Distribute Horizontally or Vertically spaces three or more instruments with equal gaps, and Distribute Across a Total spreads them evenly over a width or height you enter in inches. See Align and distribute instruments. Member tool
- Measure, the ruler: dimension lines from an item to the panel's edges, flange lines and construction lines, and between items center to center and edge to edge. It changes nothing in the design. See Measure distances on your panel. Member tool
- POH figure, the open book: a page for a pilot's operating handbook, with a numbered balloon on every instrument and a numbered list. See Make a numbered picture of your panel for your POH. Member tool
- Mirror: the second item selected goes to the same distance on the other side of the panel's center as the first. See Mirror an instrument across the panel's center. Member tool
- Move: Center On Panel, and Move / Space Items by a direction and a distance. The arrow keys nudge the selection a hundredth of an inch (Shift: a tenth). Member tool
- Placard, the tag: words on the panel, on an instrument or on their own, in the font, colors and border you choose. Select one instrument and click it to add a placard to that instrument; with nothing selected it places a placard on its own; with several placards selected it changes them together. See Placards. Member tool
- Add-on panel, the square with a line across its foot: a piece you size yourself and place beside the panel, such as a center console, a switch panel or a subpanel, with square, rounded, beveled or cove corners. Instruments and placards go on it as on the panel. See Add-on panels. Member tool
- Panel color, the paint bucket: the panel in white, aluminum, gray or black, or any color from More colors or by its number in Color #. A colored panel shows just its outline. The color is saved with the design, is in its exported pictures, and Undo takes it back. A template still shown as its photograph takes no color. See Panel color. Member tool
- Construction Lines: Add Horizontal, Add Vertical, and the eye that shows or hides them. Member tool
- Flange lines, the layers: shows or hides the flange lines on a template — cyan dashed lines marking the flanges where the panel is fastened to the airframe, and other structure behind the panel (sub-panels, stiffeners, the edge of a glare shield) that limits how deep an instrument can be behind them. Check an instrument's depth before placing it over one. They are drawn the same way on every template, cyan and dashed, whatever the template's picture used. An instrument drawn with the room its body or guard needs behind the panel (the toggle switches, circuit breakers, switch guards and some USB chargers) shows that as a flange line too, and the button shows or hides them all together. A red slash across it means they are hidden; your browser remembers the choice. Grayed on a design without any. They are never in an exported picture. See Flange lines. Member tool

- Snap-To, which snaps an instrument you are dragging to the template's edges, to the instruments near it and to construction lines. A red slash across the magnet means it is off. Member tool
The instrument search (the bar along the bottom) finds instruments by manufacturer, model, part number or keyword as you type. It searches the library, the instruments you have uploaded yourself, and any instrument already on one of your designs. The results appear to the right of the box. Click one to see its details and add it; double-click one to add it straight away. Members can also add several at once in rows; see Add several instruments at once. Member tool A display such as a G3X Touch or a GTN is one tile whose size, model and screen you choose; see Choose a display's size, model and screen. A toggle switch's color and a circuit breaker's rating are chosen the same way; see Toggle switches and circuit breakers. Instruments are no longer dragged in from the results; once on the panel, they move by dragging.
Help, the button at the bottom right of every page and of the designer, opens these articles. Search them, or type a question and it is answered from the articles. Help page, at the top of it, opens them all on the one Help page, with the rest of Hangar Flying's help.
My designs lists your saved designs. From there you create, open, rename, copy and delete designs, change the space above and below a design's panel, and download or copy the link of a design's latest export.
Equipment Library (in the row under the bar) lists every instrument and panel template in the designer, searchable by manufacturer, model or keyword.
Select an instrument or a placard by clicking it; hold Shift (or Ctrl, or Command on a Mac) and click to select several. The selection stays after Align, Distribute, Arrange, Group and Lock, so you can use one tool after another on the same instruments. See Select, group and ungroup instruments.
Select, then drag. An instrument, placard or add-on panel moves only when it is selected: click it, then drag it. See Select, group and ungroup instruments.
Hold Shift while dragging to move a selected instrument only horizontally or only vertically. Member tool
Keyboard shortcuts for selecting, nudging, deleting, undoing, zooming and the search are listed in one place. See Keyboard shortcuts.
What changed recently is on the What's new page, at the top of Help and at the foot of every page.