
Construction lines are guide lines for lining things up. They do not appear in an exported picture.
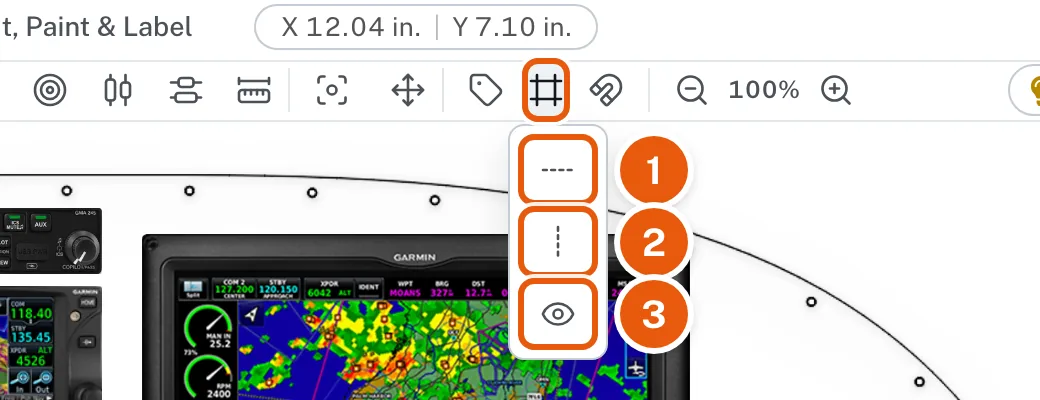
- Show or hide them: click Construction Lines in the tool row, then the eye. A design opens with its lines the way you left them, shown or hidden, on the same computer and browser; the first time, they are hidden until you press the eye. Saving leaves them as they are. While they show, the eye has a slash through it; press it to hide them again.
- Add one: click Construction Lines, then Add Horizontal or Add Vertical. A new line starts at the center of the panel. Add as many as you need. Adding one shows all the lines if they were hidden.
- Select one: click it; it turns blue. Click another to add it to the selection. Click anywhere else on the panel to deselect them all.
- Move one: drag it. The line takes the pointer from a few pixels either side, so you need not hit the dashed line exactly. For an exact position, select it and use Center On Panel or Move / Space Items, the same as for an instrument. Zoom in for finer control; see Zoom and scroll.
- Delete one: select it and click Delete in the tool row.
- Snap to one: with snap-to on and the lines showing, click an instrument to select it and drag it toward a line. When an edge or the center of the instrument comes within a few pixels of the line, it is pulled onto it and the line turns blue. Drop it there and it is exactly on the line.